The edges and corners of an object shaded using a BSSRDF tend to be dark compared to the rest of the object. I recently came up with a way to fix these dark edges and corners.
First I investigated exactly what causes dark edges. They are not typically caused by an inadequate number of irradiance samples. And they are not typically caused by the lack of single scattering—single scattering can brighten edges a little bit (since light there is more likely to enter and exit before being absorbed) but not enough to counteract the darkening effect. I discovered that, in many cases, the actual problem is not that the edges are too dark, but that the other regions are too bright. The reason that some regions are too bright or too dark is that too much or too little incident light is being considered when evaluating the diffusion approximation. My new method fixes bright and dark regions.
Using a BSSRDF involves integrating the incident radiance not only over the hemisphere above a point (as with a BRDF), but also over the surface around the point. The diffusion approximation BSSRDF that I am using is designed to work with flat, semi-infinite slabs of material. The contribution of any infinitesimal surface patch is a function of the area of that surface patch and the distance to the point being shaded (among other things). The result ends up too bright when the surface around the point being shaded is wrinkly or contains faces from other sides of the object. In those cases the surface area within any given distance is larger than it would be if the surface were flat, and the diffusion approximation gives a higher result. In addition to looking bad, this can cause violations of energy conservation by adding energy to the system. Furthermore, the result ends up too dark in thin areas where there is less surface in the vicinity of the point being shaded than there would be if the surface were flat.
To fix this, I normalize the result so that it looks the way it would look if the surface were flat. Before rendering begins I numerically integrate the BSSRDF over the a hypothetical infinite flat surface to find the total diffuse reflectance (which I use in place of the multiple scattering component during the irradiance computation pre-pass). Then during rendering, when I evaluate the diffusion approximation for real, I keep track of two things: the value it actually yields, and the value it would yield if the irradiance were 1 everywhere on the surface (which, in the case of a flat surface, is the same as the total diffuse reflectance). Then I divide the regular result by the ratio of the irradiance=1 result and the total diffuse reflectance (the flat surface irradiance=1 result). This fixes the geometry-dependent brightness variations, and gives the BSSRDF the appearance of simply blurring in space the results of a diffuse BRDF that uses the total diffuse reflectance as its albedo.
It's possible that others have done similar things in the past, but I haven't heard of it myself.
(Sorry if some of that description is unclear. I should make another pass over this post to improve it, but I wanted to get it posted sooner rather than later.)
Below are some renders that illustrate the results: a BRDF render, followed by three normalized BSSRDF renders, followed by an unnormalized (regular) BSSRDF render, followed by cropped versions of the last normalized render and corresponding unnormalized render. Click an image to bring up the lightbox, then switch between images to compare them back-to-back. The differences are most evident when switching between images in this way.
 |
| Completely opaque marble. BRDF used instead of BSSRDF. |
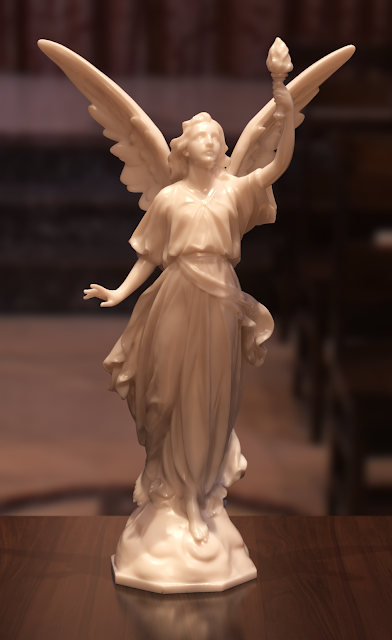 |
| Translucent marble created using a BSSRDF and my new normalization scheme. |
